Your Cart is Empty


So, you’re interested in little baby Silkies? Well, Silkies are a bantam breed which means that they are generally smaller than your average chicken and these fluffy little chickens make fabulous pets, so it’s no wonder that you’re excited for your babies to arrive. Of course, you are here because you need to know what to do next and we’re well-equipped to help you prep!
By the end of this article you will have all the knowledge you need to ensure that your little fluffballs have the right nutrition, bedding, warmth and space, from when they arrive at your doorstep until the day that they are ready to go and play outside with the bigger kids in the yard.
Silkies make some of the best backyard pets and their unique appearance makes them a popular choice for those of us looking for a “pretty” chicken. But just like any other chicken, they need proper care to grow up into the fluffy bantams we all know and love – so let’s get started.
In this guide:
Appearance of Baby Silkie Chickens
Let nature take its course or DIY
Nutritional Requirements and Treats
Introducing Chicks to a Larger Flock
Baby Silkie Health and Wellness
Common Health Concerns for Silkies
Once you have decided that you’d like to keep your own flock and you’ve decided to start out with a couple of those cute fluffy chicks known as Silkies, you will need to decide where to get them. It is a good idea to purchase your chickens from a reputable breeder in order to ensure good quality birds.
A good breeder will most likely specialize in only one or two breeds and should be able to show you the parent stock of the chicks you’ll be buying. By choosing a breeder that specializes in Silkies, you are ensuring that you get the best quality bird for the price you pay. As Silkies are fairly common all over the US, UK and Australia, you should have no trouble locating a local breeder or hatchery. Make sure that you ask for pictures or to see the parent stock of the babies you’ll be buying to make sure that their coloring is correct for what you want and that you get healthy babies.
You can buy day-old chicks but be warned that they can be very fragile. If you’re not as experienced in chicken keeping or raising chicks, it’s best to buy week-old chicks. But what do they look like?
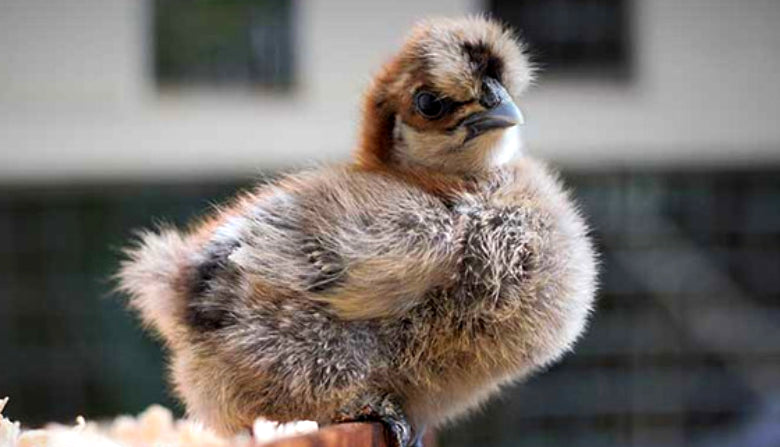
Adult Silkies are characterized by their atypical fluffy plumage, black skin, dark earlobes, combs, wattles and faces and extra toes and feathers on their feet.
Baby Silkies look very much like ordinary chicken chicks, and don’t have the typical Silkie feathers yet. Just as average chicken chicks won’t have their regular feathers when they’re very young, Silkies are covered in ordinary down when they’re babies.

The quality of their fluffy feathers do mean that Silkies produce more than average dander while they’re growing and a LOT of dust, so make sure that you select a space in your house, garage or yard that you don’t mind cleaning or getting full of dust while your babies are growing.
Look at this adorable video detailing the growth cycle of Silkie chicks.
Silkie babies are cute enough, but their mommas are where the magic happens. Silkie hens are some of the best natural incubators – let’s take a closer look at more of their wonderful qualities.
Though she be but small, she is mighty! They are known for being broody little birds and make great mommas to their babies. Many people choose to keep Silkies specifically for their broody capabilities and the fact that they love hatching eggs!

If you are interested in hatching your very own Silkies, it is a good idea to have your broody Silkie hen to the hard work for you. She will happily hatch out bunches of little cotton balls for you if given even the slightest chance.
It is a common notion among the chicken community thata Silkie can hatch a rock – and that holds true for this fluffy bantam. Most Silkie girls will prefer to sit on a clutch of eggs rather than lay an egg and forget about it, like most other chickens might do. They are also useful surrogates and will hatch anything you put under them, so if you have other chicken eggs, duck eggs or eggs from any other poultry that needs a warm body to sit on it – the Silkie is your answer!
If you present a Silkie hen with a clutch of eggs, you have a very good chance of her going broody and settling herself on them until the due date.

If you have other chickens on the homestead that you’d like to breed, adding a Silkie to your flock will provide you with a natural incubator that will require little to zero effort on your part if growing your flock.
Silkies are some of the best mothers in the entire chicken world! They will also successfully raise their young and keep them safe to the best of their ability. They are attentive and caring mothers and will even raise the offspring of their surrogate eggs given the chance!
If you don’t already have Silkies, it may be better to purchase either fertilized eggs from a hatchery or breeder that you can hatch in your incubator, or day-old or week-old Silkies that you can care for in a brooder.
If, on the other hand, you do have a Silkie hen or two in your flock already, it may be a good idea to have them lend you a hand in the hatching process as they make excellent broody birds and will generally ensure a very high hatch rate if you allow nature to take its course.
If you have a broody Silkie hen, make sure that she is safe and not getting picked on by any other birds in the flock. A broody hen needs water and food close-by at all times as she is unlikely to leave her nest for much longer than a necessary snack or sip of water. She may lose condition so a few protein-rich treats like mealworms or scrambled eggs may provide a tasty booster, and it is wise to switch her to grower feed as this is what the chicks will eat once they hatch. Make sure that your momma hen is warm and comfortable and you will soon be rewarded with tiny little cotton buds running around the coop! Just be careful when handling or treating a broody hen as even this docile little chicken turns into a fierce mama bear when she has little ones to care for.

If you don’t want to let nature run its course, or if you don’t have a Silkie hen handy, you might be interested in incubating your own eggs so that you can see the little Silkies hatch for yourself. Let’s see what incubating eggs entails.
If you are buying fertilized eggs and you don’t have a broody Silkie hen to stick them under, it is very important to have an incubator at the ready to help you hatch your baby Silkies.

Incubating and hatching eggs is probably one of the most enjoyable and rewarding aspects of chicken keeping, and we firmly believe that every passionate chicken keeper should experience this joy at least once in their chicken-keeping journey.
It is very exciting watching a hen sit on a nest for a couple of weeks until you hear those tell-tale baby peeps from underneath her feathers, but literally nothing beats watching those fluffy little ones fight their way out of the eggs, after what will feel like months (but in reality it’s just three weeks!) of keeping a close eye on the incubator. You will find yourself setting your alarm for the middle of the night just to check on those little fighters, and nothing will beat the flutter of excitement as you see that tiny little beak break through that shell.
So, you’ve decided that you’d like to try your hand at hatching your own eggs? Egg-cellent! First things first, you should always choose clean, evenly shaped, and undamaged eggs for the incubating process. It's best not to wash the eggs prior to setting, as washing can remove the protective "bloom" on the shell and make the eggs more susceptible to absorbing bacteria and other nasties, which could compromise your hatch rate. For more on this, and other incubation & hatching guides, check out theIncubating, Hatching & Raising Baby Chicks Courses from our friendsover at Chickenpedia!


It is best to not store eggs too long before placing them in the incubator. Ideally, eggs should be “set”, which means placed in the incubator for the incubation process to begin, within a week after being laid. Ten days after the eggs have been laid, the hatchability of the eggs drops significantly, so make sure that your eggs are as fresh as you can get them!
Incubators can be purchased online or in-store and there are numerous makes, models and varieties available. For most backyard chicken keepers, you will probably select a smaller one. You can also make your own incubator, but due to the precision with which the heat and humidity needs to be controlled, it is best and safest to buy one if you are unsure of your DIY skills.
“Fertile eggs can be hatched by using an egg incubator. An incubator is an enclosed structure with a fan and heater to keep eggs warm during the 21-day incubation period. When determining which incubator to purchase, we recommend using an incubator with some automatic features, such as egg turning (which is critical to chick development and to keep the chick from sticking to the inside surface of the shell) and a fan to facilitate even heat distribution,” states Dr Mikelle Roeder, a multi-species nutritionist atPurina Mills.
Regardless of which type, make or model of incubator you select for your Silkie babies, remember that heat and humidity is of the utmost importance. It is in your best interest to purchase a secondary thermometer and hygrometer to place inside of the incubator to make extra sure that your babies have all they need to successfully hatch.
These are two of the most important words in the entire incubation process. If the incubator is kept at the incorrect temperature and humidity levels for a sufficient length of time (or if levels continually change), it interferes with the normal growth and development of the embryo, and unfortunately can stop the embryo developing further.
Your temperature should be between 37.5°C – 38°C (99.5°F – 100.5°F) with the humidity between 50 and 55%. For the last stretch of the incubation process, the humidity gets cranked up to 65% - but more on that later.

Now that you have an incubator at the ready, make sure that you place it somewhere where you can frequently check on it. Additionally, just as the temperature and humidity inside the incubator can affect your eggs, the temperature outside of the incubator can as well. Try and place your incubator in a room where the temperature is 21°C – 24°C (69.8°F – 75.2°F) and not vulnerable to direct sunlight, drafts or varying temperatures.

Silkie eggs, like all other chicken eggs, should hatch within 21 days. Sometimes you may find that some of the eggs hatch a day or two early and some a day or two late, but this is nothing to worry about. Generally, though, you can count on the entire process taking 21 days. A "day" is counted as a full 24 hours, so day one would be the first 24 hours after setting the egg. If you set eggs on a Monday, it's usually a safe bet that they will hatch on a Monday, three weeks later.
Before placing your eggs in the incubator, start up the incubator and allow it to reach the accurate levels of temperature and humidity as set out in the section above. Then, using a non-toxic marker or pencil, draw an X on one end of each egg and place them in the incubator. During the first 18 days of incubation, the eggs should be turned a minimum of 3 times a day. You can get an incubator that will automatically turn the eggs, or you can turn them yourself – just be gentle!

Natural fertility may vary from 55% to 95% with season, depending on condition and age of the adult Silkies that produced the eggs. You might be safe to expect that 50% to 75% of the fertile eggs will hatch, though 90%-100% hatches can and does happen.
Because Silkie eggs are white in color, they can be candled quite easily to check their fertility. After 6 – 7 days of incubation, take out each egg in turn, hold up a flashlight to the shell in a dark room and look at the egg. If you see a dark spot with veins protruding from it, the egg is fertile and the embryo has begun to develop. If the egg is opaque, it is most likely infertile but don’t give up hope yet! Most experienced incubation experts know that embryos can be hard to spot, so don’t discard eggs before day 18!


The last few days of incubation, days 18–21, are known as "lockdown". When lockdown day comes, switch off the automatic turners if your incubator has them and increase the humidity in the incubator to around 65% - 70% and maintain it. You have to now stop turning the eggs if you’ve been doing so by hand, and you should not open the incubator unless necessary! Before going on lockdown, you can candle the eggs again to see whether any of them are infertile in order to remove them from the incubator. Waiting on an infertile egg to hatch may have you compromising the live chicks, so it is best to discard them before lockdown commences.

It is best to not try to help any chicks that are struggling to get out of the egg, as opening the incubator for even a fraction of a second during the hatching process can compromise any live chicks that are still in the shell.
Chicks can survive for between 24 – 48 hours after hatching without food or water and if you’re still waiting on some eggs to hatch, rest assured that your already-hatched babies will be safe for this period of time.
To make your life easier, we’ve put together this handy incubation chart. Print it out and keep it by the incubator to make sure that you’re on the right track. You can get this and a lot more guidance from our friends over at Chickenpedia. They will guide you through the entire incubation, hatching and raising baby chicks process.
|
Timeline |
Temperature |
Humidity |
To-Do List |
|
Day 1 |
37.5°C – 38°C |
50 – 55% |
Set up incubator and allow it to reach desired temp and humidity before setting eggs Mark eggs with a non-toxic marker or pencil on one side |
|
Day 2 – 18 |
37.5°C – 38°C |
50 – 55% |
Turn eggs three times daily |
|
Day 18 |
37.5°C – 38°C |
50 – 55% |
Candle eggs to check for fertility and embryo growth |
|
Day 18 – 21 |
37.5°C – 38°C |
65 – 75% |
Stop turning eggs Don’t open incubator |
|
Day 22 |
37.5°C – 38°C |
65 – 75% |
Open incubator to move chicks to the brooder |

After all your chicks have hatched, allow them to dry off in the incubator before moving them to the brooder. Now that you’ve got all your little cotton balls out of the incubator, it’s time to learn how best to take care of them.


Baby Silkies are some of the cutest little creatures on this planet – we absolutely adore them! And the first few weeks of their life with you are some of the most exciting. There is nothing more rewarding than watching your little ones grow up and it presents a unique opportunity for bonding with the babies, which means a family-friendly flock!
Once your chicks have hatched, or if you are buying day-old or week-old babies from a breeder or hatchery, the first thing you’ll need is a brooder. This will be their home for a couple of weeks, so it should be just right.
A brooder typically refers to some sort of heated enclosure in which you will raise your baby chicks until they are ready to go outside. In the simplest of terms, a brooder includes an enclosed space, a heat lamp, a food and water source and bedding. It can be helpful to cover the top of your brooder with a screen, mesh or grid to keep out curious pets and children or to prevent chicks escaping if the brooder sides aren’t high enough. You might think me crazy, but it does happen! I swear some of them have suspension springs in their knee joins! And although Silkies are notoriously poor fliers – they do jump! On numerous occasions in the very beginning of my own journey in raising baby chicks, I entered the room to find a few chicks running about the room, cheeping their little hearts out, lost, confused, and free! At first, I was completely bamboozled as to how this was possible but after it occurred a few times, I opted for a high-sided brooder box with an open wire mesh top, and I didn’t have the issue again!

You can either buy a ready-made chicken brooder, but brooders need not be fancy and you can quite easily build your own out of wood, cardboard or simply by repurposing plastic totes or solid-sided crates. It is important for the brooder to get fresh air though so the top should be covered with a very breathable mesh.

The brooder’s sides need to be at least 12 inches tall for chicks of one to three weeks of age but will need to be raised to at least 24 inches or more for older or more adventurous chicks.

The brooder should be placed in a warm and dry spot where the chicks are safe from drafts and the elements. It should be a safe space where no pets or predators can get to. Many people choose to keep brooders in a spare room of the house, but be reminded that chicks cause a lot of dander and dust and that can result in a very dirty room at the end of the process. For this reason, the garage or a draft-free outdoor shed is a popular choice for brooder placement.
The brooder should be set up in a warm, dry and safe space. Many people choose to place their brooders in a spare room or in the garage or a well-insulated outdoor shed. Wherever you choose to place it, make sure that it’s warm and dry and safe from the elements, potential predators, pets and other family members.
You can construct your own brooder from pretty much anything – here you are only limited by your imagination. As long as it has a solid bottom, four solid sides and either an open top or a breathable mesh top – you’re fine!
People have been known to make brooders out of aquariums, rabbit hutches, kiddie pools, cardboard boxes, plastic totes, pallets and wood.
Baby chicks need at least one square foot (30cm x 30cm) of space per chick. You can start off with less than that for the first three weeks and move them to a bigger space as they grow.

Chicks need three things to thrive in life: heat, food and water. Heat for chicks is very important and if the brooder isn’t kept at the correct temperature, your chicks could perish. Chicks cannot regulate their own body temperature and can chill very quickly. I can’t stress this point enough! I know it seems like I am harping on about the same old thing, but it could mean the difference between a live chick and a dead one.
Start the brooder temperature at 95°F (35°C) and reduce it by approximately 5°F (3°C) each week until the brooder temperature is the same as the ambient room temperature. Make sure that the temperature is constant. Whatever heating equipment you choose to use, I recommend that you have a second separate thermometer so you can double check the temperature, as it is so important.
The best way to regulate temperature in a brooder is with a heating pad or plate. This is less dangerous than a lamp as it isn’t a fire risk. If you’re opting for a pad or plate, make sure that it can stay on indefinitely and won’t shut off after a couple of hours. The plates are made to have a space underneath so that the chicks can huddle underneath the pad or around it for heat. If you have a pad, you should suspend it a couple inches off the ground to give the chicks the option to cluster underneath it like they would with their momma.

A heating lamp is the second option for a heat source. There are a number of risks involved in using a heat lamp but if you know how to mitigate them, it is a viable option. Because you cannot program a heat lamp or set its temperature at an exact point, you will need to place a thermometer inside the brooder to keep track of your temperature. A heat lamp is suspended above the brooder and its height can be adjusted as you need to adjust the temperature.

An infrared bulb is more efficient and a better choice than a warm or white light. The reason for this is because it doesn't stop the chicks from sleeping, which white light does, and can help prevent pecking. You also get ceramic lamps that give off no light whatsoever, but they can get hot to the touch and you may accidentally burn yourself if you brush against it. Any metal light will get hot to the touch though, so be careful when operating in or around your brooder and make sure that the chicks cannot flap up and into the light or its fixture to prevent burns. A lamp guard is the best way to protect all involved and making sure that the wires are out of pecking reach and the chicks cannot accidentally access the light or its fixture at all.

In addition to all of this, heat lamps and flammable materials like cardboard brooders or shavings for bedding can be lethal as it is a fire risk. A heat lamp that is not securely fastened can end up falling into the brooder and setting it alight or it may explode and burn where it falls. It really is a fire risk, so if you do choose to go the lamp route, make sure you take all the necessary precautions.

It is quite easy to tell whether or not chicks are too hot or too cold if you keep a close enough watch on them. If the chicks are spread out far from one another and the heat source, panting and holding their wings away from their bodies, they are too hot. If the chicks are huddled underneath or near the heat source in one big pile and chirping loudly, they are too cold. If they are moving around the brooder, scratching and cheeping, eating and drinking, pooping, they are just right.
Now that we’ve covered the brooder basics like size, construction and temperature, it’s important to focus on the bedding. A brooder should always be lined with an appropriate bedding material as a slick or slippery surface can cause splay leg or other mobility issues in chicks.
The best choice for bedding in a brooder is hemp or dust-free pine shavings as cedar shavings can release harmful oils. It is best to steer clear of using newspaper as the print can be harmful and the slick surface can make it difficult for them to walk.


Bedding should be spread approximately an inch thick across the entire brooder floor.
I have heard people use a variety of other bedding options like clean sand, cedar shavings or pine chips. However, from my experience, the best things to use will always be pine shavings or hemp bedding. They are inexpensive, won’t cause respiratory issues, are super absorbent and easy to clean and will keep your little ones happy and dry.
Although not necessary, it can be a good idea to install one or two very low roosts in the brooder. This can be as simple as a wooden dowel rod (free from splinters!) suspended about four inches off the ground.
If you choose not to install roosts in your brooder, it can be a good idea to introduce them to your chookies’ at a later stage in their lives once they start to venture out of the brooder for little field trips. From about four weeks of age, you can start to encourage them to roost by providing little perches. Roosts help build balance and a roosting nature in your little ones because adult chickens feel safest when they can roost for the night.

It is quite fun to watch your little ones start to hop up on the roosts on their own and a little chick perching is a joy to behold. For Silkies, just make sure that the roosts aren’t too high as they cannot fly and may injure themselves if they fall from a roost!
Pick up each chick individually and place them in the brooder. The first thing you want to do is make sure that they know where to get water and food. Regardless of what type of waterer you’re using, take each individual chick and either dip their beak into the water tray or tap it against the drinker so that they know where to find their water. Chicks can dehydrate very easily – so this is a super important step!

Next, place a paper towel in the brooder and drop some feed on it. Chicks are very curious and will naturally wander over to see what made the noise. Their curiosity will then urge them to peck at it and in this way, they will learn what their food looks and tastes like.
This is just the basics, for a full guide on making sure that your Silkie babies has the best start in life, head over to theUltimate Guide to Raising Baby Chickens on Chickenpedia.
But before we leave you with your littlies – let’s take a look at what you’ll need to feed them.
Silkie chicks need food, water, heat and lots of love in order to thrive. Some may say that the love is optional, but we believe different. However, as much as we love our babies, we must always make sure that their nutritional requirements are met.
Although it might seem obvious, I always like to remind people that chicks need different food to your adult hens. Not only are their little mouths smaller so they often cannot manage the pelleted food your adult chickens eat, but the nutrients in adult chicken food can be extremely detrimental to their health.
Most adult chicken food has too much calcium for growing babies and it can damage their kidneys beyond repair. That’s why you should stock up on Chick Starter feed before you bring your little ones home.
Silkie chicks should eat Starter feed from day one to the age of 6 weeks after which they move on to Grower Feed which they will eat until week 20 of their little lives.

No pet owner can resist spoiling their babies with treats and chicken owners are no different! Silkies, like any other chickens, absolutely love treats and it’s a good idea to make sure that you’re stocked up on treats that are good for your little ones before you even bring them home. The reason for this is because chicks can start eating treats from just one week old!
Good treats to buy for your chicks include dried mealworms, oats, carrot, eggs and crushed maize.

Do you have any favorite treats that you feed your own Silkies? Do you feed your chicks treats from week one? Let us know in the comments!
If we’re talking treats, then we have to talk shell grit. Shell grit is one of the most important things you can provide for chickens of all ages. Although Silkie chicks don’t need shell grit if they’re only being fed Starter feed, they do need it if they are getting any treats of any kind.

I just know that you’ll want to spoil your fluffy little babies, so buy some fine shell grit to help their digestive systems along.
This is another pantry staple that all veteran chicken keepers absolutely swear by – me included! I absolutely believe that apple cider vinegar is one of the best things that you can provide for your feathered friends. It is chock-a-block full of good-for-the-gut elements that will boost your babies’ digestive and immune systems.

Once your babies are fed and watered, the time for taming comes. You can give them the best start in life and they’ll grow up to be little and strong, but if you want to keep them as a pet, it’s best to start the taming process early – so let’s take a look at how you go about bonding with your babies.
The best part of raising your baby Silkies yourself is that it affords you the opportunity to bond with them early on, which means that they are likely to be friendly when they’re adults.
Silkies are generally friendly and docile birds that make good family pets, but getting started on the taming process early on will only benefit you in the long run.
You can start taming your babies by holding a treat like a mealworm or a tasty bit of lettuce in your hand and placing your hand in the brooder. The chicks will naturally come to inspect it after a while. Allow them to peck at the treat until they know that it’s delicious – soon they’ll come running!

Once your chicks are comfortable with your hand offering treats, try petting them by rubbing their chests gently with a finger while you’re offering a treat. This gets them used to your touch and is a relaxing way for them to get used to being petted. After a few days of doing this, don’t be surprised if they hop into your hand for a cuddle! Take things slow and soon they’ll happily spend time sitting with you.
Once your chicks have spent sufficient time in the brooder, you’ll want to start thinking about integrating them into the rest of the flock. So, let’s get started on what you need to know for the big move!
It can be fun to have cute fluffy chicks in the brooder in your home for a while, but it is taxing and they are high maintenance during this stage of their life.
Your Silkie chicks will also soon be fully fluffed out and wanting to explore. Chickens love to forage, scratch around and are very curious little creatures. That is why we move them to the outdoor coop or run as soon as they are ready.
Ideally, chicks will not require a heat source when moving from brooder to coop. If the temperatures outside remain above 65°F (18°C) and the chicks are at least 6 weeks old, I think it’s safe to say that they can move into the coop without supplemental heat.

Most chicks can leave the safety and warmth of the brooder at 6 – 8 weeks of age. However, this can vary between breeds and even individual birds and the time of year will play the largest part. If it is still cool in your area at the time that they are due to hit the road, then you may need to keep them inside for a few extra weeks. Don’t move your chicks outside until they have all their adult feathers as without these, they cannot regulate their body temperature and could catch a chill and die – and we definitely don’t want that!
You might be thinking that introducing chicks to a flock of older hens will be easy because they have a mothering instinct. This is not always the case. Your older flock is likely to not share your excitement about these new little pests eating their food and stealing their treats.
You need to ease the flock into accepting the chicks by giving them plenty of time to get used to the idea. It’s important to keep the chicks safe because an adult chicken can easily kill a baby.
It is best to integrate a little group of chicks to an older flock. Don’t try to introduce one single chick to an older flock. If you only have one chick, it will become a target for bullies and the more it is bullied, the more others are likely to join in. That is also why we always recommend getting at least four to five chicks.

Wait until chicks are at a minimum 6 weeks old to begin introductions, but 8 weeks would be better as Silkies are slow growers and very small even when they reach their adult stage. The younger the chicks, the longer you are going to want to draw out the introduction period. Ideally, by the time you mix the flocks permanently, the chicks will be bigger and fully feathered out (around 10-12 weeks).
The chicks will need an outdoor space next to the older flock, but separated by wire. The idea is to let everyone see and smell each other and size one another up, but they cannot touch or harm each other. Allow the introductions to start slowly, first put the chicks in the separate area for one day. Then increase the length of their stay to two days before removing them again.
Once the chicks are feathered, let them spend at least two weeks in the separate section next to the older flock. Then, choose a nice day and allow the older flock and the little ones to free range together on a neutral area and keep them supplied with plenty of treats and food in various places. Also provide a hiding place for the little ones into which they can run if bullied. The hiding place should have an opening that the babies can get through but not the older hens. Watch them carefully. A few squabbles are OK and completely natural but if the fighting is serious or blood is drawn, separate the flocks again and start from scratch. Remember that Silkies are very docile and may not defend themselves against more aggressive birds!
If the flocks are doing well in the neutral area, you can move the chicks to the coop with the older hens. Remember to still provide a hiding place in the coop which the chicks can enter but the older hens can’t, in case they are bullied when you aren’t around.
If you’re moving Silkies outside, make sure that they have plenty of space to shelter if it is rainy as Silkies aren’t waterproof and may chill and die if they get wet. On that note, let’s take a closer look at the basic health and wellness concerns for baby Silkies.
Silkies are no different to any other chicken when they’re little and they can suffer from several of the most common health concerns that afflict other chickens’ chicks. However, once they’re grown, Silkies have some specialized needs but they are still fairly low maintenance when compared to some of the other exotic breeds.
For a full guide on chicken health, please head on over to Chickenpedia and theirUltimate Guide to Chicken Health course which covers every possible chick health concern that there is!
Eliminate the guesswork and stress by becoming informed. Learn how to prevent common illnesses in your Silkie chickens through this accessible online health course. I highly recommend it to all my Silkie parents, and they all tell me they wish they had done it sooner!

Once they’re grown, Silkies require the same amount of care and attention than other chickens, but they may require additional attention to make sure that their foot feathering stays clean and dry and that they don’t get wet during rainy weather.
Silkies have dense feathering on their feet that can get sullied or icy in wet or muddy weather. Make sure that your babies have plenty of dry and sheltered space and that their bedding stays warm and dry. They are also not waterproof, so you should avoid having your Silkies out in the rain and provide plenty of shelter for them.
Silkies also have notoriously poor eyesight due to their powder puff crest of fluffy feathers that usually completely obscure their eyes from view. This makes them susceptible to predators and can make them skittish. If you are worried that your fluffy chickens are having trouble seeing their surroundings, you can gently trim the fluff around their eyes to better their view. If you are going to be showing your Silkies though, it is a better idea to use a soft hair tie or clip to tie the plumage back instead of trimming it down, as damage to the feathers will hamper the bird’s show quality.

So, there you have it. Baby Silkie chickens are very cute little additions to the family, and make fantastic family pets that are fairly low maintenance. Incubating your own eggs is an incredibly rewarding experience and taking care of baby Silkies in a brooder is a wonderful time for many backyard chicken keepers. We highly recommend that you invest the time and effort into raising your baby Silkies from hatch-day to adulthood as it is one of the most rewarding experiences you will ever have.
No matter the chicken you choose for your backyard buddies, make sure that you've got the knowledge you need to raise a happy, healthy flock. Did you know 67% of chicken keepers surveyed experienced a chicken health or behaviour issue in the first 12 months that they didn’t know how to handle?
But don’t worry! Our feathered friends over at Chickenpedia have created a comprehensive online course that covers everything you need, including what to look for in an unhealthy chicken and how to support your hens to optimal health. All of their courses are really well structured and beginner-friendly, which is why I highly recommend them to all of my readers!
Click here to check out Chickenpedia today!
Do you have any Silkies of your own? Send us your pictures and stories – we love reading & sharing our readers’ Silkie stories!

Thank you much for your lovely information about silkie chicks this might just save there lives I recommend everyone to read this

Excellent!!!
Comments will be approved before showing up.
Jordan Parsons
May 24, 2023
This really helped me a lot!